
The standard way to add/create dialog’s in SPEAK is to add the Dialog Window control, and then add the controls required by the dialog to the Dialog Window’s placeholders.
This has a number of disadvantages
- Each new page that requires the dialog has to add all the renderings/settings that the dialog requires.
- The code related for the dialog is added to the code page.
- If you need to add/remove controls from the dialog you have to update all the pages that use the dialog
- If you have a page with a lot of dialog’s the page will have a LOT of controls and all the code
In order to address the afore mentioned issues and enable reuse of dialog’s across a number of pages, we introduced the concept of a Dialog Rendering item; which contains all the renderings required by the Dialog, and defines its own sub-page code which contains the code required by the dialog.
In this blog we will create a attachment dialog, as the uploader control that comes with SPEAK is very cool (look out for an upcoming blog post)..

Adding/showing a dialog
There are a 4 steps in order to add and then show a dialog:
- Create the Dialog Rendering Template. (Whilst this is not required, as you could add the layouts to any item, I would strongly recommend defining a template).
- Create the Dialog Rendering item
- Add the Dialog Window Control and add the required controls to the Dialog Window placeholder.
- Add a SubPageCode control and create the JavaScript which provides the functionality required by the dialog.

- Add the dialog to the page using Client side insert renderings.
- The guid is the rendering item id (i.e. the attachment item defined in step 2).
- Then save the dialog in the subpage controls list with a unique name.

contextApp.insertRendering("{26D93861-13E8-4416-8319-0D03094A19CB}", { $el: $("body") }, function (subApp) {
        contextApp["showAddAttachmentDialog"] = subApp;

      });
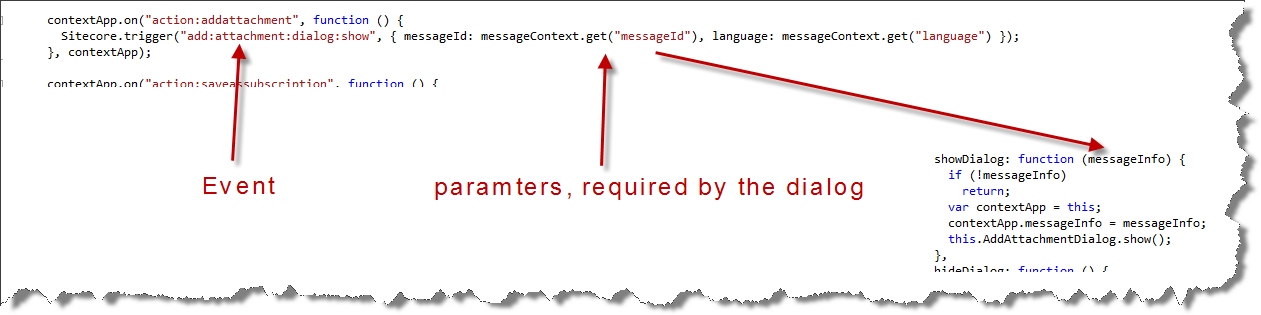
- To show the dialog the show function on the DialogWindow control has to be called. There are a number of ways this could be achieved, but I decided to implement it as follows
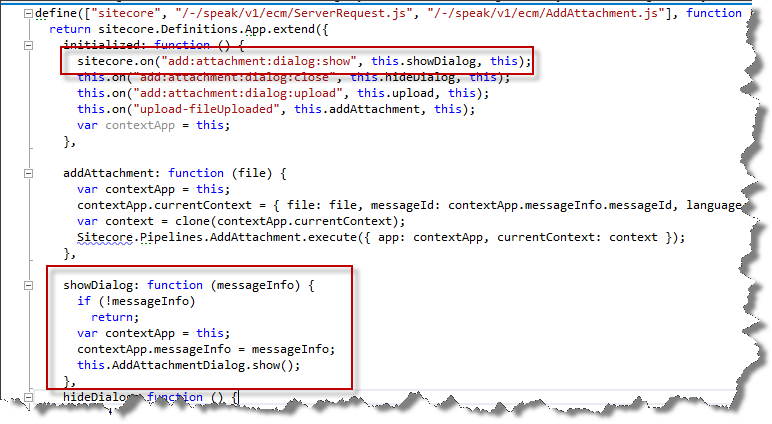
- In the initialize function for the dialog (SubPageCode JavaScript), set up an event handler to listen for a show event i.e. add:attachment:dialog:show.
- Define a showDialog function which calls the DialogWindow.Show().

- To show the dialog, trigger the event and pass the in the required parameters.

Context Issue
The dialog does not have access to the page’s context and controls; therefore you pass the required context via the event parameters.
This in fact reduces dependencies as the only dependency is the event parameters; therefore the dialog is not aware of where it is called from.

Pingback: Sitecore SPEAK adventures - geek.vincesaru.nl